Creativity is contagious, turn it!
STAY HOME
"It Has Never Be Easier
To Save Lives"
#StayHome.
Tutorial-StayHomeByCréativeAttitude Written on: 04/04/2020
This tutorial was made with PSP x5 but can be done with other versions
(This tutorial was created, imagined and written by myself.
Any resemblance to another tutorial would be coincidental.)
* * * * * * * * * * * * * * * * * * * * * * * * * * * * * * * * * * * * * * * * * * * * * * * * * * * * * * * * * * * * * * * * * * * * * * * * * * * * * * * * * * *
- Ce Tutoriel Est Disponible En Français Ici -
* * * * * * * * * * * * * * * * * * * * * * * * * * * * * * * * * * * * * * * * * * * * * * * * * * * * * * * * * * * * * * * * * * * * * * * * * * * * * * * * * * *
Filters:
Medhi ⇒ Wavy Lab11
<I.C.NET Software>: Filters Unlimited 2 / Mock ⇒ Windo
Dsb Flux ⇒ Blast
AP Lines / Silverlinning ⇒ V shaped
<I.C.NET Software>: Filters Unlimited 2 / Taodies ⇒ What Are You?
<I.C.NET Software>: Filters Unlimited 2 / Filters Factory G ⇒ Bevel 1.5
Download here
* Tube of your choice
The PTU tube "Vicki" that I used is From © AlexPrihodko
* * * * * * * * * * * * * * * * * * * * * * * * * * * * * * * * * * * * * * * * * * * * *


* * * * * * * * * * * * * * * * * * * * * * * * * * * * * * * * * * * * * * * * * * * * * * * * * * * * * * * * * * * * * * * * * * * * * * * * * * * * * * * * * * * * * * *
Place the selections in your usual folder
Open the tubes and duplicate them, close the originals
Depending on the colors you will use
feel free to change the mode and opacity of layers
* * * * * * * * * * * * * * * * * * * * * * * * * * * * * * * * * * * * * * * * * * * * * * * * * * * * * * * * * * * * * * * * * * * * * * * * * * * * * * * * * * * * * * *
1.
In the style and texture palette
Put two colors of your tube
a light color in the foreground
and a dark color in the background
Open a transparent image of 900 x 550 pixels
2.
Effects / Plugins / Filters Unlimited 2.0 / Medhi ⇒ Wavy Lab
Adjustment - Blur - Gaussian Blur
3.
Effects / Plugins / Dbs Flux ⇒ Blast
Effects / Plugins / Dbs Flux ⇒ Blast
4.
Layer - Duplicate
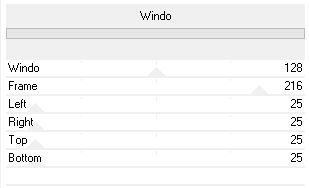
Effects / Plugins / Mock ⇒ Windo
5.
Effect / image effect / Seamless Tilling
Change the Mixing mode to "Soft Light"
Layers - Merge - Merge visible layers
6.
Layer - Duplicate
Effects / Plugins / Filters Unlimited 2.0 / Filter Factory G ⇒ Bevel 1.5
7.
Image - Resize
Effect / image effect / Seamless Tilling
8.
Place on the bottom layer
Selections - Load / save selection -
Load selection from disk
Select the selection "Sel01-StayHome"
and click on Load
Selection transform into layer
Selections - Deselect all
Move this layer to the top of the stack
9.
Setting - Blur - Gaussian Blur (same setting)
Effects / Plugins / AP Lines SilverLining filter ⇒ Breaks
Change the Mixing mode to "Screen"
10.
Return to the layer below
Effects - 3D Effects - Drop Shadow
11.
At the top of the stack
Copy - paste decoration tube 1
Change the Mixing mode to "Soft Light"
12.
Place on the bottom layer
Selections - Load / save selection -
Load selection from disk
Select the selection "Sel02-StayHome"
and click on Load
Selection transform into layer
Selections - Deselect all
Move this layer to the top of the stack
13.
Effects / Plugins / Taodies ⇒ What Are You?
Effects - 3D Effects - Drop Shadow (same setting)
Layers - Merge - Merge visible layers
14.
Image - Add borders - Symmetric checked
Size of 2 pixels = Color White
Edit - copy
Image - Add borders - Symmetric checked
Size of 1 pixel = Dark Color
Image - Add borders - Symmetric checked
Size of 3 pixels = Color White
Image - Add borders - Symmetric checked
Size of 12 pixels = Dark Color
With the magic wand
Select this border
Edit - paste into selection
Selection - Deselect all
15.
Copy - Paste Your tube
Resize if necessary
Effects - 3D Effects - Drop Shadow (to your liking)
Place on the right
16.
Copy - Paste Wordart
Place as on my model
Layers - Merge - Merge visible layers
17.
Add your signature
And Copyright if you use a designer tube
Add my copyright
Tutorial Created By © CreativeAttitude / www.creativeattitude.wixsite.com / Version Of (YourName)
Layers - Merge - Merge visible layers
Here ! Your tag is finished
* * * * * * * * * * * * * * * * * * * * * * * * * * * * * * * * * * * * * * * * * * * * * * * * * * * * * * * * * * * * * * * * * * * * * * * * * * * * * * * * * * * * * *
Please send me your versions to this address
creativeattitude.wix@gmail.com
* * * * * * * * * * * * * * * * * * * * * * * * * * * * * * * * * * * * * * * * * * * * * * * * * * * * * * * * * * * * * * * * * * * * * * * * * * * * * * * * * * * * * *