top of page
Creativity is contagious, turn it!
* * * * * * * * * * * * * * * * * * * * * * * * * * * * * * * * * * * * * * * * * * * * * * * * * * * * * * * * * * * * * * * * * * * * * * * * * * * * *
Place the selections in your usual folder
Open the tubes and duplicate them, close the originals
Depending on the colors you are going to use
feel free to change the mode and opacity of the layers
* * * * * * * * * * * * * * * * * * * * * * * * * * * * * * * * * * * * * * * * * * * * * * * * * * * * * * * * * * * * * * * * * * * * * * * * * * * * *
1.
Open a transparent image of 900 x 500 pixels
In the style and texture palette
Put two colors of your tube
a light color in the foreground
and a dark color in the background
2.
Effects / Plugins / Filters Unlimited 2.0 / Medhi ⇒ Wavy Lab

3.
Effects / Plugins / Filters Unlimited 2.0 / Medhi ⇒ Sorting Tiles

Layer - duplicate
image - Mirror
Change the Blend mode to "Multiply"
Layer - merge with the layer below
Effects / Edge Effects / Emphasize
4.
Selections - Load / save a selection -
Load selection from disk
Select the selection "Sel01-MyHeart"
and click Load

Selection - turn to layer
Selection - deselect all
5.
Effects / Plugins / AP Lines SilverLining filter ⇒ Horizontal Gaps

Effects / Plugins / <I.C.NET Software>: Andrew's Filters 1 / ⇒ Blur Up

Change the Blend mode to "Multiply"
6.
Effects / Plugins / <I.C.NET Software>: Filters Unlimited 2 /
It @ lian Editors Effect ⇒ Effectto Fantasma

Effects - 3D Effects - Drop Shadow
Shade your light color

8.
Go to the bottom layer
Copy - paste the deco tube 1
Change the Mix mode to "Soft Light"
9.
At the top of the stack
Layer - New raster layer
Selections - Load / save a selection -
Load selection from disk
Select the selection "Sel02-MyHeart"
and click Load

Fill with your light color
Selections - Deselect all
10.
Effects / Plugins / <I.C.NET Software>: Filters Unlimited 2 /
Taodies ⇒ Weaver

Object - Alignment - Top
Layer - duplicate
Image - Return
Layers - Merge - Merge with layer below
Effects / Plugins / AP Lines SilverLining filter ⇒ V-Shaped

Move this layer to the bottom layer
Reduce opacity to 50%
11.
Go to the bottom layer
Selections - Load / save a selection -
Load selection from disk
Select the selection "Sel03-MyHeart"
and click Load

Selection transform to layer
Selections - Deselect all
Move this layer to the top of the stack
12.
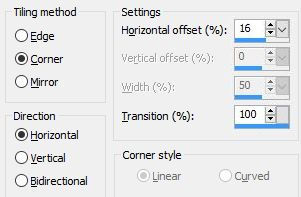
Seamless image / mosaic effect / effect

Effects / Plugins / <I.C.NET Software>: Filters Unlimited 2 /
Taodies ⇒ What Are You?

Effects - 3D Effects - Drop Shadow

13.
Copy - paste the deco tube 2
Layer - Rearrange - Arrange Down
Change the Mix mode to "Soft Light"
14.
At the top of the stack
Copy - paste the deco tube 3
Change the Mix mode to "Soft Light"
Layers - Merge - Merge visible layers
15.
Image - Add borders - Symmetric checked
2 pixel size = Color White
Edit - copy
Image - Add borders - Symmetric checked
Size of 30 pixels = Dark Color
With the "Magic wand" tool
Select this border
Edit - paste into selection
Effects / Plugins / Carolaine & Sensibility ⇒ CS Dlines
Selection - inverted
Effects - 3D Effects - Drop Shadow (same setting)
Selections - Deselect all
16.
Copy - Paste Your Tube
Resize if needed
Effects - 3D Effects - Drop Shadow (to your liking)
Place on the left
17.
Copy - Paste Wordart
Place as on my model
Layers - Merge - Merge visible layers
18.
Image - Add borders - Symmetric checked
1 pixel size = Dark Color
Image - Add borders - Symmetric checked
2 pixel size = Color White
19.
Add your signature
And Copyright if you use a designer tube
Add my copyright
Tutorial Created By © CreativeAttitude / www.creativeattitude.wixsite.com / Version From (YourName)
Layers - Merge - Merge visible layers
Here ! Your tag is finished
* * * * * * * * * * * * * * * * * * * * * * * * * * * * * * * * * * * * * * * * * * * * * * * * * * * * * * * * * * * * * * * * * * * * * * * * * * * * *
Do not hesitate to send me your version to this address
creativeattitude.wix@gmail.com
bottom of page