Creativity is contagious, turn it!
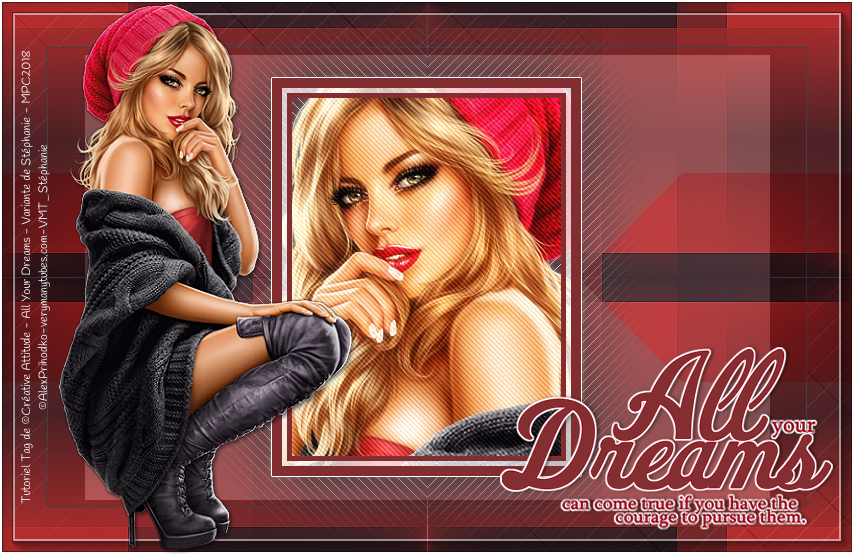
All Your Dreams
can come true if you have the courage to pursue them


Tutorial-AllYourDreams-ByCreativeAttitude Written On: 05/11/2018
This tutorial was made with PSP x5 but can be done with other versions
(This tutorial was created, imagined and written by myself.
Any resemblance to another tutorial would be pure coincidence.)
* * * * * * * * * * * * * * * * * * * * * *
filters:
AP Lines ⇒ Silverlinning
AAA Frame ⇒ FotoFrame
L & K's ⇒ Paris
Simple ⇒ Pizza Slide Mirror
Mock⇒ Windo
Medhi ⇒ Sorting Tiles
Carolaine & Sensibility ⇒ CS Dlines
Download here
* Tube of your choice
The PTU "Sylvie" tube that I used is from © Alex Prihodko
Place selections your usual folder
* * * * * * * * * * * * * * * * * * * * * * * * * * * * * * * * * * * * * * * * * * * * * * * * * * * * * * * * * * * * * * * * * * * * * * * * * * * * * * * * * * * *
If you want to use your own colors,
do not hesitate to change the mode and opacity of the layers
* * * * * * * * * * * * * * * * * * * * * * * * * * * * * * * * * * * * * * * * * * * * * * * * * * * * * * * * * * * * * * * * * * * * * * * * * * * * * * * * * * * *
1.
In the style and texture palette
Put two colors of your tube
a foreground
and the other in the background
And prepare a Linear Gradient
Open a transparent image of 850 x 550 pixels
Fill with gradient
2.
Effects / Plugins / Medhi ⇒ Sorting Tiles
Effect / Edge Effect - Emphasize
effect / image effect / Seamless Tilling
Layers - Duplicate
3.
Effects / Plugins / Mock ⇒ Windo
Effects / Plugins / & <BKG Designers sf10 I> ⇒ 4 Way Average
4.
Selections - Load / Save Selection-
Load selection from disk
Select selection "Sel01-AllYourDreams"
and click on Load
turn the selection into a layer
Selections - Deselect All
Effects / Plugins / L & K's ⇒ Paris
5.
Layer - New raster layer
Selections - Select All
selection - modify - contract 45px
fill in the color AR plan
change / contract selection of 1px
Edition - Cut
Selections - Deselect All
6.
Place on the bottom
Layer - New Layer - Raster Layer
Selections - Load / Save Selection-
Load selection from disk
Select the selection "Sel02-AllYourDreams" and click on Load
turn the selection into a layer
Selections - Deselect All
Move this layer to the top of the stack
Effects / Plugins / single ⇒ pizza slice mirror
Repeat Effects / Plugins / single ⇒ pizza slice mirror
Change Blend Mode to "Soft Light"
7.
Copy - Paste Deco tube 1
Copy - Paste Your Tube
and move under the deco tube 1
place the face in the frame
Selections - Load / Save Selection-
Load selection from disk
Select the selection "Sel03-AllYourDreams" and click on Load
selection - reversed
Delete (delete or delete key on your keyboard)
Selections - Deselect All
Layer - Duplicate
Adjustment - Blur - Gaussian Blur
Change the blend mode for soft light
Place on the layer below
Effects / Plugins / CAROLAINE AND SENSIBILITY ⇒ CS-DLines
Place on top layer
Layers - Merge - Merge with the layer below
Place yourself on the deco layer 1
Layers - Merge - Merge with the layer below
8.
Effects - 3D Effects - Drop Shadow
NB: Check shadow on a new layer
And put in color your dark color
Position yourself on the layer of the shadow
Effects / Plugins / AP Lines SilverLining filter ⇒ V-Shaped
9.
Place on the bottom layer
Layer - duplicate
and close the eye of the layer
Layers - Merge - Merge Visible Layers
reopen the eye of the layer
Move to the merged layer
Selection - Select All
Selection - Floating
Selection - Static
Effects / Plugins / AAA Frames ⇒ Photo Frame
Image - Add Borders - Symmetric Checked
Size of 2 pixels = White color
10.
Copy - Paste Your tube
Resize if needed
Effects - 3D Effects - Drop Shadow (to your taste)
Place on the left
11.
Copy - Paste Your The Wordart
Place on the right
Layers - Merge - Merge Visible Layers
12.
Add your signature
And Copyright if you use a designer tube
Add my copyright
Tutorial Created By © CreativeAttitude / www.creativeattitude.wixsite.com / Version Of (YourName)
Layers - Merge - Merge Visible Layers
Here ! Your tag is finished
* * * * * * * * * * * * * * * * * * * * * * * * * * * * * * * * * * * * * * * * * * * * * * * * * * * * * * * * * * * * * * * * * * * * * * * * * * * * * * * * * * * *
Feel free to send me your version to this address
creativeattitude.wix@gmail.com
* * * * * * * * * * * * * * * * * * * * * * * * * * * * * * * * * * * * * * * * * * * * * * * * * * * * * * * * * * * * * * * * * * * * * * * * * * * * * * * * * * * *


download the material here


Thank you to all the creative friends for your beautiful versions.


