Creativity is contagious, turn it!
* * * * * * * * * * * * * * * * * * * * * * * * * * * * * * * * * * * * * * * * * * * * * * * * * * * * * * * * * * * * * * * * * * * * * * * * * * * * *
Place the selections in your usual folder
Open the tubes and duplicate them, close the originals
Depending on the colors you are going to use
feel free to change the mode and opacity of the layers
* * * * * * * * * * * * * * * * * * * * * * * * * * * * * * * * * * * * * * * * * * * * * * * * * * * * * * * * * * * * * * * * * * * * * * * * * * * * *
1.
Open a transparent image of 900 x 500 pixels
In the style and texture palette
Put two colors of your tube
a light color in the foreground
and a dark color in the background
and prepared a Linear gradient with the following settings:
Fill with gradient
Adjustment - Blur - Gaussian Blur radius at 30
2.
Effects / Plugins / Filters Unlimited 2.0 / &<Bkg Designer sf10I> ⇒ Corner Half Wrap
Effects / Plugins /Filters Unlimited 2.0 - °v° Kiwi`s Oelfilter ⇒ Guch Mal

Redo - Effects - Plugins - ° v ° Kiwi`s Oelfilter ⇒ Guch Mal (same setting)
Layers - Duplicate
Image - Mirror
Reduce Opacity to 50%
Layers - Merge - Merge visible layers
Effects / Edge Effects / Enhance
3.
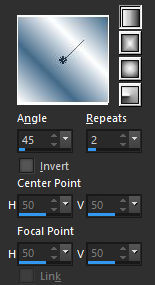
Effects - Reflection Effects - Rotating Mirror

Layers - Duplicate
Image - Mirror
Image - return
Reduce Opacity to 50%
Layers - Merge - Merge visible layers
4.
Layers - Duplicate
Image - Free rotation

5.
effect / image effect / Seamless tiling

Change the Mix mode to "Soft Light"
6.
Go to the bottom layer
Selections - Load / save a selection -
Load selection from disk
Select the selection "Sel01-NeverWasted"
and click Load

Selection transform to layer
Selections - Deselect all
Move this layer to the top of the stack
7.
Effects / Plugins / AP Lines SilverLining filter ⇒ Zag Accross

Change the Mix mode to "Soft Light"
8.
Go to the bottom layer
Selections - Load / save a selection -
Load selection from disk
Select the selection "Sel02-NeverWasted"
and click Load

Selection transform to layer
Selections - Deselect all
Move this layer to the top of the stack
effect / image effect / Seamless tiling (same setting)
9.
Effects / Plugins / <I.C.NET Software>: Filters Unlimited 2 /
Penta.com ⇒ Color Dot

Change the Mix mode to "Soft Light"
10.
Effects - 3D Effects - Drop Shadow

11.
Copy - paste the deco tube 1
Layers - Merge - Merge visible layers
Effects / Plugins / <I.C.NET Software>: Filters Unlimited 2 / Simple ⇒ Left Right Wrap
12.
Image - Add borders - Symmetric checked
Size of 2 pixels = Color White
Edit - copy
Image - Add borders - Symmetric checked
Size of 10 pixels = Dark Color
With the "Magic wand" tool
Select this border
Edit - paste into selection
Selections - Deselect all
13.
Copy - Paste Your Tube
Resize if needed
Effects - 3D Effects - Drop Shadow (to your liking)
Place on the left
14.
Copy - Paste Wordart
Place as on my model
Layers - Merge - Merge visible layers
15.
Image - Add borders - Symmetric checked
2 pixel size = Dark Color
Image - Add borders - Symmetric checked
Size of 15 pixels = Color White
16.
Copy - paste the deco tube 2
17.
Add your signature
And Copyright if you use a designer tube
Add my copyright
Tutorial Created By © CreativeAttitude / www.creativeattitude.wixsite.com / Version From (YourName)
Layers - Merge - Merge visible layers
Here ! Your tag is finished
* * * * * * * * * * * * * * * * * * * * * * * * * * * * * * * * * * * * * * * * * * * * * * * * * * * * * * * * * * * * * * * * * * * * * * * * * * * * * * * * * * *
Do not hesitate to send me your version to this address
creativeattitude.wix@gmail.com