Creativity is contagious, turn it!


TutorialScrapCrunchyLeavesBy © CréativeAttitude / Written on: 25/09/2020
* The Software I used is Corel Paint Shop Pro x5
* Tube of your choice
The "Megan" PTU tube I used is from © misticheskaya

* The rest of the material used was found on the net
(This tutorial was created, imagined and written by myself.
Any resemblance to any other tutorial would be coincidence.)
******************************************************************************************************
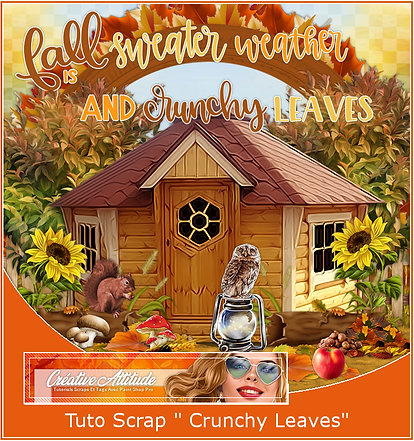
NB: To correctly place the elements, take an example from my model
Do not hesitate to refer to it several times during your realization
1
Copy / paste the tube "Background"
Object - Alignment - Top
And close the eye of the layer we will come back to it later
2
Copy / paste the tube "ClusterBackground"
3
Copy / paste the tube "Cluster"
And move the "ClusterBackground"
so that it is well inside the "Frame"
Go to the "Cluster" layer
Layer - merge with the layer below
Object - Alignment - Top
And close the eye of the layer we will come back to it later
4
Copy / paste the tube "Foliage"
5
Copy / paste the tube "Grass"
Object - Alignment - Bottom
6
Moved the tube "Foliage
so that it is on the top of the "Grass" tube
7
at the top of the stack
Copy / paste the "Fence" tube
Place on the right of your scrapbook
Layer - duplicate
Mirror image
8
Copy / paste the tube "Tree"
Place on the right of your scrapbook
Layer - duplicate
Mirror image
9
Copy / paste the tube "Caban"
place in the middle of your scrap
10.
Copy / paste the tube "Sunflower"
place on the left of your scrapbook
Layer - duplicate
Mirror image
11.
Copy / paste the tube "Wood"
place on the left of your scrapbook
12.
Copy / paste the tube "Wood2"
place on the right of your scrapbook
13.
Copy / paste the tube "Leaves"
place in the middle in front of the tube "caban"
14.
Copy / paste the tube "Mushroom"
place on the left of your scrapbook
15.
Copy / paste the tube "Leaves2"
place on the right of your scrapbook
16.
Copy / paste the tube "Chestnut"
place on the right of your scrapbook
17.
Copy / paste the tube "Lantern"
place on the left of your scrapbook
18.
Copy / paste your tube
Resize if needed
Effects - 3D Effects - Drop Shadow (to your liking)
Place in the middle of your scrap
19.
Copy / paste the tube "Leaves3"
place in front of your tube
20.
Check your items that they are all well placed
(see model if necessary)
Merge visible layers
21.
Image - Resize

Object - Alignment - Bottom
22.
Reopen the eye of the "Background" and "Cluster" Tube
23.
Copy / Paste the "wordart"
Place as on my model
24.
If you use a paid tube put the copyright of the artist
and your MANDATORY license.
Add my copyright
Tutorial Created By © CreativeAttitude / www.creativeattitude.wixsite.com / Version From (YourName)
Sign your creation
Merge visible layers
save as png
Here ! Your Scrap is finished
* * * * * * * * * * * * * * * * * * * * * * * * * * * * * * * * * * * * * * * * * * * * * * * * * * * * * * * * * * * * * * * * * * * * * * * * * * * * * * * * * * * * * * * *
Do not hesitate to send me your version to this address
creativeattitude.wix@gmail.com
* * * * * * * * * * * * * * * * * * * * * * * * * * * * * * * * * * * * * * * * * * * * * * * * * * * * * * * * * * * * * * * * * * * * * * * * * * * * * * * * * * * * * * * *