Creativity is contagious, turn it!
Snowflakes
Are kisses from heaven

Tutoriel-KissesFromHeaven-ByCréativeAttitude write the: 28/11/2018
This tutorial was made with PSP x5 but can be done with other versions
( This tutorial was created, imagined and written by myself.
Any resemblance to another tutorial would be pure coincidence.)
Ce Tutoriel Est Disponible En Francais Ici
* * * * * * * * * * * * * * * * * * * * * *
Filters:
Funhouse ⇒ Patchwork
< I.C.NET Software > : Filters Unlimited 2 / Taodies ⇒ Weaver
< I.C.NET Software > : Filters Unlimited 2 / Taodies ⇒ What Are You ?
Topaz Labs ⇒ Topaz Clean 3
Ap Lines ⇒ Silverlinning
Carolaine & Sensibility ⇒ CS Dlines
Download here
* Tube of your choice
The PTU tube "Christmas Angel 2" that I used is from ©VeryMany
* * * * * * * * * *
Place selections your usual folder
* * * * * * * * * * * * * * * * * * * * * * * * * * * * * * * * * * * * * * * * * * * * * * * * * * * * * * * * * * * * * * * * * * * * * * * * * * * * * * * * * * * *
If you want to use your own colors,
do not hesitate to change the mode and opacity of the layers
* * * * * * * * * * * * * * * * * * * * * * * * * * * * * * * * * * * * * * * * * * * * * * * * * * * * * * * * * * * * * * * * * * * * * * * * * * * * * * * * * * * *
1.
In the style and texture palette
Put two colors of your tube
a foreground
and the other in the background
And prepare a Radial gradient
Open a transparent image of 900 x 500 pixels
Fill with gradient
2.
Adjustment - Blur - Gaussian Blur
Layer - New Layer - Raster Layer
Selections - Select All
Copy Your tube and paste in the selection
Selections - Deselect All
effect / image effect / Seamless Tilling
Adjustment - Blur - Gaussian Blur (same setting)
Layers - Merge - Merge Visible Layers
3.
Effects / Plugins / Funhouse ⇒ Patchwork
4.
Copy - Paste the decorative tube 1
Reduce Opacity to 20%
5.
Place on the bottom layer
Selections - Load / Save Selection-
Load selection from disk
Select selection "Sel01-KissesFromHeaven"
and click on Load
turn the selection into a layer
Selections - Deselect All
Move this layer to the top of the stack
6.
Effects / Plugins / <I.C.NET Software>: Filters Unlimited 2 / Taodies ⇒ Weaver
Change Blend Mode to "Soft Light"
7.
Layer - New Layer - Raster Layer
Selections - Load / Save Selection-
Load selection from disk
Select the selection "Sel02-KissesFromHeaven" and click on Load
Fill with your Dark color
Selections - Deselect All
Effect / Edge Effect - Emphasize
effect / image effect / Seamless Tilling (same setting)
Reduce opacity to 80%
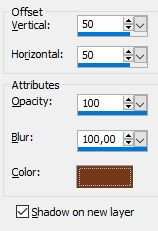
Effects - 3D Effects - Drop Shadow
7.
Copy - Paste Deco tube 2
Layer - Duplicate
On the layer below
Effects / Plugins / <I.C.NET Software>: Filters Unlimited 2 / Taodies ⇒ What are you?
8.
Selections - Load / Save Selection-
Load selection from disk
Select the selection "Sel03-KissesFromHeaven" and click on Load
Edition - Cut
Keep the selection
to stand on the raster layer 3 (Bands)
Edition - cut
Selections - Deselect All
9.
Open the image in psp (mine or one of your choice)
Effects / Plugins / Topaz Labs ⇒ Topaz Clean 3
10.
Edition - copy
Return to your tag
Edit - paste as a new layer
place this layer under the decorative tube 2
Selections - Load / Save Selection-
Load selection from disk
Select the selection "Sel04-KissesFromHeaven" and click on Load
Edition - Cut
Selections - Deselect All
Change Blend Mode to "Overlay"
11.
Copy - Paste the decorative tube 3
Effects - 3D Effects - Drop Shadow
NB: Check shadow on a new layer
And put in color your dark color
Position yourself on the layer of the shadow
Effects / External modules / AP Lines SilverLining filter ⇒ Zigzag
Change Blend Mode to "Overlay"
Layers - Merge - Merge Visible Layers
12.
Image - Add Borders - Symmetric Checked
Size of 2 pixels = White color
Edition - copy
Image - Add Borders - Symmetric Checked
Size of 15 pixels = Dark color
With the magic wand select this border
Edit - paste in the selection
Effects / Plugins / Carolaine & Sensibility ⇒ DS Line
Selections - Deselect All
13.
Copy - Paste Your tube
Resize if needed
Place on the left
Effects - 3D Effects - Drop Shadow (to your taste)
14.
Copy - Paste The Wordart
Place on the right
Layers - Merge - Merge Visible Layers
15.
Add your signature
And Copyright if you use a designer tube
Add my copyright
Tutorial Created By © CreativeAttitude / www.creativeattitude.wixsite.com / Version Of (YourName)
Layers - Merge - Merge Visible Layers
Here ! Your tag is finished
* * * * * * * * * * * * * * * * * * * * * * * * * * * * * * * * * * * * * * * * * * * * * * * * * * * * * * * * * * * * * * * * * * * * * * * * * * * * * * * * * * * *
Feel free to send me your version to this address
creativeattitude.wix@gmail.com
* * * * * * * * * * * * * * * * * * * * * * * * * * * * * * * * * * * * * * * * * * * * * * * * * * * * * * * * * * * * * * * * * * * * * * * * * * * * * * * * * * * *


Thank you to all the creative friends for your beautiful versions.